Whether you have fine hair, curly hair, or any other hair type, here are three words to rock your style world: at-home blowouts.
With a blow dryer brush, you can get that luscious salon blowout without scheduling an appointment or paying salon prices. A blow dryer brush is a combination of a hair dryer and styling brush. And this trendy 2-in-1 styling tool doesn’t just give you salon results at home—it can also simplify your hair care routine and keep your hair healthier in the long run. Gone are the days when you use multiple hot tools, such as curling iron, to achieve the hairstyle you want and prevent or minimize hair damage.
In this guide, we’ll break down how to use a blow dryer brush and why you should seriously consider getting one (if you haven’t already).
How to Use Your Blow Dryer Brush in Five Easy Steps
While blow dryer brushes may seem to function through advanced technology, they’re actually pretty easy to use. But to get the most va-va-VOOM look out of your blow dryer brush, follow these five simple steps:
Step 1: Gather Your Tools
Your blow dryer brush is your most important tool, but to get that salon-quality blowout, you’ll need a few other items. These include:
- A comb or wet brush
- A heat-protectant spray, cream, or serum
- A heat setting product
- Hair clips, salon clips, or scrunchies
- Setting spray
- Optional: root volumizer for people with fine hair
Step 2: Start With Combed, Damp, Heat-Protected Hair
While you can start with wet hair or damp hair, towel-drying your hair or allowing it to partially air dry will result in a better blowout.
Additionally, it’s always a good idea to apply a heat-protectant spray, cream, or serum to your hair before using any kind of heated styling tool. So, once your hair is partially dry:
- Apply your heat protectant spray, cream, or serum
- Comb through to ensure it’s distributed evenly
Step 3: Section Your Hair with Clips
If you’ve ever watched your stylist blowout your hair at the salon, you have an idea of what sectioning your hair looks like. At home, you can use this strategy to make sure you adequately reach all of your hair (even the underneath parts) and avoid going over the same area more than once.
Create four sections of hair by:
- Parting your hair down the middle
- Parting your hair across the back (slightly above your ears)
Then, use your clips or scrunchies to keep the sections separated until you reach them.
Step 4: Blow and Curl, or Blow and Smooth
Depending on the look you’re trying to achieve, you’ll want to either blow-and-curl or blow-and-smooth your hair. For both looks, you’ll start by turning the blow dryer brush on low or medium heat and airflow—save those faster speeds and higher temps for quick touch-ups once you’ve gotten a handle on using the tool.
Then, working on one section at a time, remove your clip and separate a section of hair about 1–3 inches wide.
- To add curl – Start underneath your section of hair at the root and pull your brush down the length of your hair, rolling the brush away from you as you go. This will cause the hair to wrap around the blow dryer brush, curling and drying it simultaneously. Once your hair is fully rolled, hold it for 10 seconds, then slowly release.
- To straighten or smooth – Starting underneath your hair and working from root to tip, slowly pull the blow dryer brush through each section. The trick to getting smooth, straight, and shiny hair with a blow dryer brush is to work slowly and continue the process until all of your hair is totally dry.
Step 5: Add Volume and Set
Once you’ve dried and styled your hair to perfection, you can add a little root volumizer and finish the look off with a setting spray to ensure gorgeous volume and it holds strong all day long.
Then, you can go conquer the world.
Why Buy a Blow Dryer Brush?
Aside from achieving a salon-quality blowout at home, there are two main reasons why a blow dryer brush is a superior choice to a separate dryer and brush when you’re styling:
- It frees up one hand – If your dryer and brush are combined into a single device, you have a free hand to aid in the styling process. That means no more starting and stopping, no more putting down and picking up tools, and no more getting tangled in cords. You’ll likely find that simplifying your styling routine in this way will save you a ton of time getting ready.
- It reduces heat exposure – By drying and styling your hair simultaneously, you can reduce the time your hair is exposed to other heated products after you’ve blow-dried it (like curling irons or straighteners). And the less your hair is exposed to heat, the less likely you are to experience hair damage in the form of dry, brittle hair.1 Plus, for all you ladies who color your hair, less heat exposure means longer-lasting color.
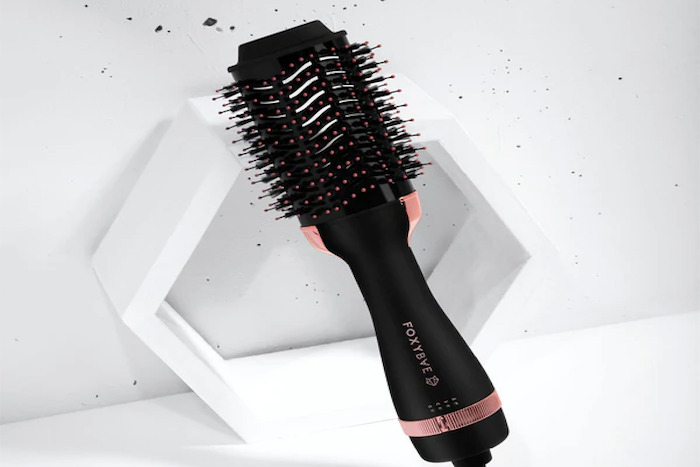
You can also reduce your hair’s heat exposure by investing in a quality blow dryer brush, like FoxyBae’s Rose Gold Blowout Dryer Brush Pro. This brush was designed to combine the right levels of heat and wind to give you that salon blowout look without drying out or damaging your hair. Plus, its salon-grade motor means this hair styling secret weapon will last you for years of blowouts to come.
For All Your Hair Care Needs and More, Trust FabFitFun
At FabFitFun, finding products that can simplify your beauty routine while enhancing it is what we’re all about. That’s why we partner with trusted, high-quality brands to deliver the best, most innovative products directly to your door.
As a FabFitFun member, you also get access to our online store and exclusive community sales so that you can stock up on all the latest in beauty, wellness, fashion, and more, whenever you want!
Try a seasonal or annual membership to see for yourself why millions of people just like you are choosing FabFitFun.
Sources:
- Annals of Dermatology. Hair Shaft Damage from Heat and Drying Time of Hair. https://www.ncbi.nlm.nih.gov/pmc/articles/PMC3229938/#:~:text=Results,dried%20group%20without%20hair%20dryer.
