SUMMER 2020 BOX PARTNER
Even though we’ve had to put all of our beauty appointments on hold due to social distancing, you can take this opportunity to practice and perfect your makeup application and hairstyling skills. The first key to maximizing your looks this summer comes down to finding cosmetics so good they make you look like it was done by a pro. Of course, technique matters, too.
To guide you through DIY glam, celebrity hairstylist Avian King and celebrity makeup artist Omayma Ramzy lend their expertise below. With their experience on actual celebs, you’ll be ready for your big debut by the time lockdown ends.
Prep your base
Makeup artists always begin with a hydrated, primed base. As Ramzy explains, using a hydrating serum can also help you obtain a smoother surface, and maintain fresh makeup throughout the day. “The Too Faced Hangover Good in Bed Ultra-Replenishing Hydrating Serum‘s ingredients are so deeply hydrating, with two different hyaluronic acids that retain moisture and produce plumpness in the skin,” she states. While moisture-binding HA minimizes the appearance of fine lines, vitamin B5 calms, conditions, and provides even more hydration.
As our expert explains, the benefit of using a serum is that it has smaller molecules that can penetrate the skin more thoroughly. “By using serums as part of your daily skin and makeup routine, you are pumping more nutrients and moisture into the skin, allowing the ingredients to work deeper, so that [your complexion] can stay plump and hydrated throughout the day. This results in makeup staying fresher and lasting longer.”
Select your makeup applicator
MUAs have special tricks for making foundation look seamless, and it all begins with beauty tools, like the MakeupDrop Hybrid Makeup Applicator. “The beauty of a hybrid makeup applicator like a sponge and silicone pad is how truly versatile it is,” explains Ramzy. “The silicone section is for laying your product down, for sculpting, and for outlining, and is truly amazing for getting a really even layer of base on. Then, the sponge section is like your typical beauty blender, and is there to even everything out and get a seamless finish.”
As for using this foundation-perfecting gadget, Ramzy reminds you to always dampen the sponge before use. It should be used with a patting and dabbing technique, which softens layers of product into a seamless finish. She adds that you can use the tip of the sponge for the under-eye zone, as well as around the nose to get into hard-to-reach creases. “I like to use my clean sponge to take off excess makeup where I get creases,” she shares about the smile lines, where glasses sit, and around the eyes. Lastly, she shares that you can use the sponge to set your look of the day with powder, making it the very definition of more bang for your buck.
Don’t forget to prime and set
We have already learned about the importance of using a primer, but the beauty of a priming spray, like the Too Faced Hangover 3-in-1 Replenishing Primer & Setting Spray, is it’s a quick and easy application. “This spray is fantastic for someone who wants to be able to do their makeup faster, with [fewer] products,” says Ramzy, who notes that it adds a little extra hydration and hold to make your makeup last longer and apply smoother. “This spray triples up not only as a setting spray but also for using with products like eyeshadow if you wanted to intensify your eyeshadow look,” she continues.
To do so, spritz it onto your brush once you’ve already loaded it with pigment to make the product more intense and dramatic. “I really like to do this with a light, shimmery eyeshadow on the inner corner of my eye to add light and give a brighter, more awake look.”
To use it as a setting spray, simply mist your completed face of makeup all over. Then, use a beauty sponge — like your MakeupDrop — to pat and set your makeup. “Using the sponge with the spray with lock in more hydration while preventing it from looking too caked or heavy,” she notes. “By misting throughout the day, you will reactive your foundation and makeup, making it feel fresh and lasting much longer.”
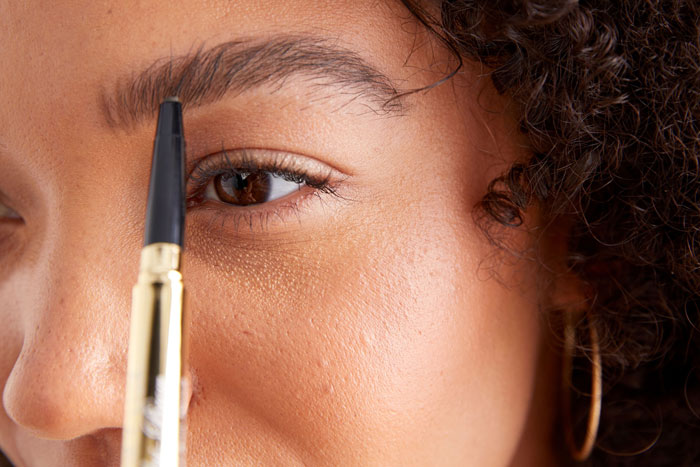
Getting your brows just right
Great brows can be life-changing, and as Ramzy reveals, a brow pencil, like the WINKY LUX Uni-Brow Universal Eye Pencil can help you get them just right. “First use the spoolie brush side to brush all the hairs up. This lets us see where the most sparse areas are and what we will need to fill,” she begins.
Next, envisions the shape you would like to create, drawing imaginary lines from the edge of the nostril and past the inner corner of the eye, to determine where the brow should start. For the tail — which is critical — do so again from the nostril past the outer corner of the eye. For the arch, draw one more imaginary line from the nostril through the center of the eye and up to the brow to determine the ideal shape.
“Start with the pencil, lightly sketching from the inner area, mimicking hair strokes to keep it looking like big, fluffy, natural brows. The trick is to fill sparse areas with hair-like strokes, too. As you are filling, go back and forth with the filling, then brush the hairs back, fill some more, and brush some more.” For the tail, she advises not to make it look too downturned, as this will drag the eyes down. “To finish it off, use your favorite brow gel or wax to hold it in place!”
Perfect your blow out
“Getting salon-quality hair at home may seem daunting, but with a few minor adjustments, that hairdresser bounce could be closer than you know,” King states. First things first, King recommends using moisturizing hair products and washing your hair with cool-temperature water to seal the cuticle and enhance shine.
Next, towel-dry your hair by squeezing out excess moisture, cutting down on drying time, and preventing excess water from diluting your products. Then comes the product — such as the amika Brooklyn Bombshell Blowout Spray — which she notes adds volume, texture, thermal protection, shine, and hold. “It is super important to protect your hair using a heat protectant,” she says, reiterating the importance of using a blow-dry primer or blowout spray.
Next comes the blow-dry itself, starting only when your hair is 75-80% dry. “The easiest way to blow out your own hair is to start with your hairline and bangs. Then part your hair down the middle down the back, separating each side with two clips.” Blow-dry each side with the airflow directed downwards, towards you, beginning with the roots. Still keeping the airflow pointed downwards, “Work your way up the back of the head using your brush, bringing everything towards you.” Why? Because “sealing the cuticle layer of the hair shaft down is how you lock in shine and shape.”
Finally, style with a curling iron if you’d like, but the cherry on top? “A light shine spray or dry oil on the ends, and shake it out.”
xx, The FabFitFun Team
Psst! Have you signed up for FabFitFun yet? Don’t miss out on $200+ in amazing beauty, fitness, fashion, and lifestyle products, access to exclusive fitness and cooking content on FabFitFunTV, members-only sales, and more. Use code SUNFUN at checkout for 10% off your first box.
To get the most out of your box products, make sure to check out the Insider page.


